用户界面和自定义事件
为了让基于 AR.js 的Web应用看起来更好同时添加UI功能,我们可以将其视为普通网站。在这里,您将学习如何使用 Raycaster 、自定义事件以及与覆盖的DOM元素交互。
处理AR内容上的点击

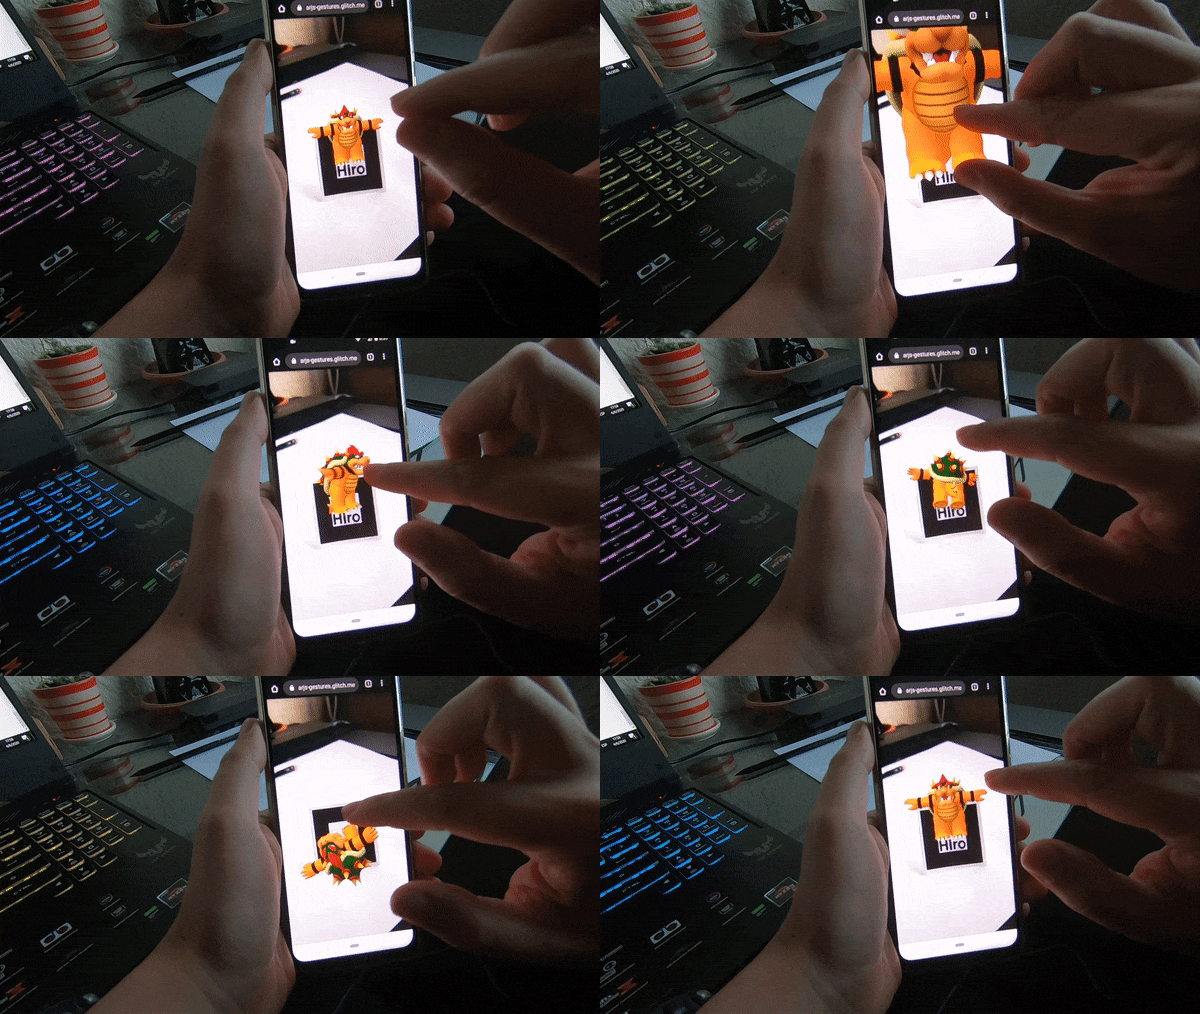
现在可以使用带有最新版 a-frame 的 AR.js (基于标记和图像追踪),用触摸手势就可以缩放和旋转您的内容。声明:这些操作使用用于您的整个a-scene,所以如果你必须处理多个不同标记直接的交互,这可能就不适用了。如果场景中只有一个标记/图像,那就是它的舞台了。
为了将这个特性添加到您的 AR.js web 应用中,请参阅 Fabio Cortes 的great walkthrough
您可以将这种精确的方法应用到图像追踪a-nft和基于标记的a-entity元素。clickhandler名称可以自定义。
请记住,这种点击/触摸交互根本不是由 AR.js 处理的,它完全是基于 A-Frame 的。要了解更多细节,请查看 A-Frame 文档。
与覆盖在 DOM 内容上的层进行交互
您可以通过在<body>上添加DOM HTML元素来添加交互。例如:
<!DOCTYPE html>
<html>
  <script src="https://aframe.io/releases/1.0.4/aframe.min.js"></script>
  <script src="https://raw.githack.com/AR-js-org/AR.js/master/aframe/build/aframe-ar.js"></script>
  <body style="margin : 0px; overflow: hidden;">
    <a-scene embedded arjs>
      <a-marker preset="hiro">
        <a-entity
          position="0 0 0"
          scale="0.05 0.05 0.05"
          gltf-model="https://arjs-cors-proxy.herokuapp.com/https://raw.githack.com/AR-js-org/AR.js/master/aframe/examples/image-tracking/nft/trex/scene.gltf"
        ></a-entity>
      </a-marker>
      <a-entity camera></a-entity>
    </a-scene>
  </body>
</html>
2
3
4
5
6
7
8
9
10
11
12
13
14
15
16
17
我们可以在<a-scene>外侧包裹一层:
<div class="buttons">
  <button class="say-hi-button"></button>
</div>
2
3
然后,我们需要添加一些 CSS 来绝对定位<div>和<button>,还需要一些 JS 来监听单击事件。
您可以自定义<a-scene>或内容,如3D模型、播放视频等等。参见 A-Frame 文档以了解如何更改属性和处理事件。
<!DOCTYPE html>
<html>
  <script src="https://aframe.io/releases/1.0.4/aframe.min.js"></script>
  <script src="https://raw.githack.com/AR-js-org/AR.js/master/aframe/build/aframe-ar.js"></script>
  <script>
    window.onload = function () {
      document
        .querySelector(".say-hi-button")
        .addEventListener("click", function () {
          // 这里你可以更改 <a-scene> 或 <a-entity> 的属性,比如更改3D模型资源、尺寸、位置等,也可以打开链接,触发动作等等。
          alert("Hi there!");
        });
    };
  </script>
  <style>
    .buttons {
      position: absolute;
      bottom: 0;
      left: 0;
      width: 100%;
      height: 5em;
      display: flex;
      justify-content: center;
      align-items: center;
      z-index: 10;
    }

    .say-hi-button {
      padding: 0.25em;
      border-radius: 4px;
      border: none;
      background: white;
      color: black;
      width: 4em;
      height: 2em;
    }
  </style>
  <body style="margin : 0px; overflow: hidden;">
    <div class="buttons">
      <button class="say-hi-button">SAY HI!</button>
    </div>
    <a-scene embedded arjs>
      <a-marker preset="hiro">
        <a-entity
          position="0 0 0"
          scale="0.05 0.05 0.05"
          gltf-model="https://arjs-cors-proxy.herokuapp.com/https://raw.githack.com/AR-js-org/AR.js/master/aframe/examples/image-tracking/nft/trex/scene.gltf"
        ></a-entity>
      </a-marker>
      <a-entity camera></a-entity>
    </a-scene>
  </body>
</html>
2
3
4
5
6
7
8
9
10
11
12
13
14
15
16
17
18
19
20
21
22
23
24
25
26
27
28
29
30
31
32
33
34
35
36
37
38
39
40
41
42
43
44
45
46
47
48
49
50
51
52
53
自定义事件
AR.js 派发了数个自定义事件。既有通用事件也有 AR 专用事件。
| 自定义事件名称 | 描述 | Payload | 源文件 | 功能 |
|---|---|---|---|---|
arjs-video-loaded | 当摄像机视频流加入DOM时触发 | { detail: { component: <HTMLElement> }} | threex-artoolkitsource.js | 所有 |
camera-error | 当相机视频流无法检索时触发 | { error: <Error> } | threex-artoolkitsource.js | 所有 |
camera-init | 当相机视频流被正确检索时触发 | { stream: <MediaStream> } | threex-artoolkitsource.js | 所有 |
markerFound | 当要追踪的标记和图像出现在视野内时触发 | - | component-anchor.js | 只有图像和标记追踪功能。 |
markerLost | 当要追踪的标记和图像从视野内消失时触发 | - | component-anchor.js | 只有图像和标记追踪功能。 |
arjs-nft-loaded | 当 nft 标记完全加载后触发 | threex-armarkercontrols-nft-start.js | 只有图像追踪。 | |
gps-camera-update-positon | 当 gps-camera更新它的位置时触发 | { detail: { position: <GeolocationCoordinates>, origin: <GeolocationCoordinates> }} | gps-camera.js | 只有基于位置功能 |
gps-entity-place-update-positon | 当gps-entity-place位置更新位置时触发 | { detail: { distance: <Number> }} | gps-entity-place.js | 只有基于位置功能 |
gps-entity-place-added | 当gps-entity-place添加时触发 | { detail: { component: <HTMLElement> }} | gps-entity-place.js | 只有基于位置功能 |
gps-camera-origin-coord-set | 当设置原始坐标时触发 | - | gps-camera.js | 只有基于位置功能 |
gps-entity-place-loaded | 当gps-entity-place观测到 A-Frame 的 loaded事件时触发 | { detail: { component: <HTMLElement> }} | gps-entity-place.js | 只有基于位置功能 |
内部加载事件
⚡️ 图像跟踪和基于位置的 AR 都会子女东处理内部事件,当:
- 原始位置已设置
- 图像追踪(图像标识符)已完全加载
它会自动移除匹配.arjs-loader选择器的DOM 元素。
在上述情况下,您可以添加任何想要删除的自定义 loader,只需给个`.arjs-loader类就行了。
当发现图片时触发操作
当图像/标识出现在视野里时,您可以触发任何您想要的动作。您大可不必将内容链接到图像/标识,只在相机找到锚点时触发(比如重定向到外部网站)。
<script src="https://cdn.jsdelivr.net/gh/aframevr/aframe@1c2407b26c61958baa93967b5412487cd94b290b/dist/aframe-master.min.js"></script>
<script src="https://raw.githack.com/AR-js-org/AR.js/master/aframe/build/aframe-ar-nft.js"></script>

<style>
  .arjs-loader {
    height: 100%;
    width: 100%;
    position: absolute;
    top: 0;
    left: 0;
    background-color: rgba(0, 0, 0, 0.8);
    z-index: 9999;
    display: flex;
    justify-content: center;
    align-items: center;
  }

  .arjs-loader div {
    text-align: center;
    font-size: 1.25em;
    color: white;
  }
</style>
<script>
  AFRAME.registerComponent('markerhandler', {
    init: function () {
      this.el.sceneEl.addEventListener('markerFound', () => {
        // 重定向到 URL
        window.location = 'https://github.com/AR-js-org/AR.js';
      });
  });
  },
</script>

<body style="margin : 0px; overflow: hidden;">
  <div class="arjs-loader">
    <div>Loading, please wait...</div>
  </div>
  <a-scene
    vr-mode-ui="enabled: false;"
    renderer="logarithmicDepthBuffer: true;"
    embedded
    arjs="trackingMethod: best; sourceType: webcam;debugUIEnabled: false;"
  >
    <a-nft
      markerhandler
      type="nft"
      url="https://arjs-cors-proxy.herokuapp.com/https://raw.githack.com/AR-js-org/AR.js/master/aframe/examples/image-tracking/nft/trex/trex-image/trex"
    >
    </a-nft>
    <a-entity camera></a-entity>
  </a-scene>
</body>
2
3
4
5
6
7
8
9
10
11
12
13
14
15
16
17
18
19
20
21
22
23
24
25
26
27
28
29
30
31
32
33
34
35
36
37
38
39
40
41
42
43
44
45
46
47
48
49
50
51
52
53
当发标识时触发操作
<script src="https://cdn.jsdelivr.net/gh/aframevr/aframe@1c2407b26c61958baa93967b5412487cd94b290b/dist/aframe-master.min.js"></script>
<script src="https://raw.githack.com/AR-js-org/AR.js/master/aframe/build/aframe-ar-nft.js"></script>

<script>
  AFRAME.registerComponent('markerhandler', {
    init: function () {
      this.el.sceneEl.addEventListener('markerFound', () => {
        // 重定向到自定义URL
        window.location = 'https://www.google.com/';
      })
    }
  });
</script>

<body style="margin : 0px; overflow: hidden;">
  <a-scene
    vr-mode-ui="enabled: false;"
    renderer="logarithmicDepthBuffer: true;"
    embedded
    arjs="trackingMethod: best; sourceType: webcam; debugUIEnabled: false; detectionMode: mono_and_matrix; matrixCodeType: 3x3;">

    <a-marker markerhandler type='barcode' value='7'>
        <a-box position='0 0.5 0' color="yellow"></a-box>
    </a-marker>

    <a-entity camera></a-entity>
  </a-scene>
</body>
2
3
4
5
6
7
8
9
10
11
12
13
14
15
16
17
18
19
20
21
22
23
24
25
26
27
28
